Key Dates for Spring '19 Release (Feb 9, 2019)
☒ Dec. 17th – 31st, 2018: Begin preparation by reading through Release Notes and online Instructions. Check online blogs for discussions from other Admins and Developers, and look through information posted on Salesforce Admin Podcast pages.
☒ Thrs., Jan 3rd, 2019: Spring '19 Pre-release Signup. Sign up for a pre-release org to get early access to the new features.
☒ Fri., Jan 4th – Sat., 5th, 2019: Salesforce rolls out "Spring '19 preview" into customer sandboxes for internal testing of new features.
☒ Jan. 5th – Jan 31st, 2019: Test out new functionality in two places. Be mindful of browser and its version, as well as Lightning vs. Classic differences.
- Preview Instance: Use the login credentials provided through pre-release signup.
- Internal Sandbox: All sandboxes have pre-release updates, use sandbox with most data.
- Trailhead: Spring '19 Release Highlights link to trail (2 hours). Others are 7 – 10 hours.
☒ Fri., Jan. 25th, 2019: Salesforce LIVE podcast going over features we shouldn't overlook.
☒ Jan 28-Feb 1:, 2019: Release Readiness multi-day video streaming series of webinars.
☒ By Jan. 31st, 2019: In Classic UI/Theme3, perform critical updates and validate. Setup>Critical Updates. Take specified actions so that certain features become available to org.
☒ By Jan. 31st, 2019: Communicate major changes to users beforehand so that they're prepared. I recommend.
☒ Sat, Feb. 9th, 2019: Salesforce Spring '19 Major Release rolls out for most production orgs. Perform validation testing of key functionality during the week of February 11.
☐ March {Date T/B/D}, 2019: Salesforce will increase data storage for all organizations. When date becomes available, be sure to validate this update in production org.
SUMMARY OF KEY ENHANCEMENTS
Move to Lightning:
More Tools to Adopt Lightning Experience and Boost Productivity.
- Forced Lightning Migration in Winter '20 Release: Salesforce will begin pushing all orgs to Lightning this October on a rolling basis. Take advantage of the lead time before Lightning Experience is turned on to understand how your org's features and customizations perform in the new interface and to prepare your users via change management. Start now to ensure a better experience for everyone when Lightning Experience is turned on later. Better yet, take control and turn on Lightning Experience for your users before this update is auto-activated, on your own terms. (Pg. 425)
- Lightning Experience Configuration Converter: Scan All Objects At Once: For the JavaScript Buttons tab and Actions and Buttons tab, it's one click to scan and see all the actions and buttons for all objects. Salesforce is also introducing a way to move actions and buttons for all objects at once. And coming in early 2019, Salesforce is adding support for Visualforce pages to the converter to make your transition to Lightning smoother. (Pgs. 39 & 42)
- Lightning Experience Adoption: More Ways to Discover and Adopt the New Salesforce to make it easier to transition to Lightning Experience, we created a central hub for all of the recommended steps. Show Salesforce prompts that recommend Lightning Experience in sandbox environments, instead of only seeing these prompts in production orgs. Guide your users with custom help in the redesigned help menu. (Pgs. 42 – 43)
Data Management:
- Increased Data Storage: Company Information in setup menu shows data storage. Data storage for select editions is increasing from 1 GB to 10 GB, giving you lots more room to grow. For example, previously a Professional Edition org with 10 users received 1 GB, because 10 users multiplied by 20 MB per user allotment is 200 MB. Now, a Professional Edition org with 10 users receives 10 GB + 200 MB. This change applies to Lightning Experience, Salesforce Classic, and all versions of the Salesforce app in Contact Manager, Group, Essentials, Professional, Enterprise, Performance, and Unlimited editions. Orgs will begin to see the increase beginning in late March 2019. (Pg. 8, 38, 55)
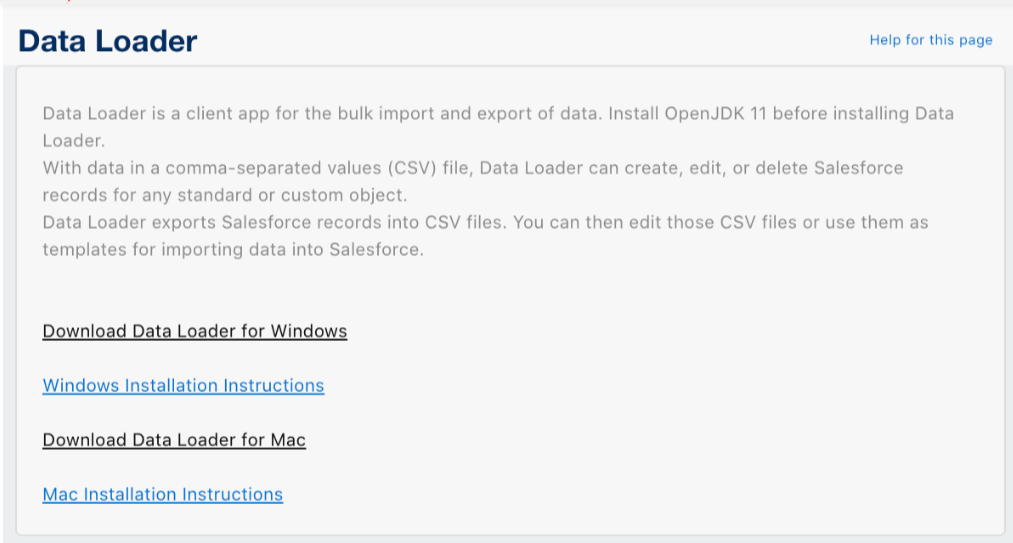
- Update to Retention Limit for Field History Data: Salesforce guarantees to retain your field history data for up to 18 months through your org, and up to 24 months via the API. As announced in Winter '19, starting in Spring '19, we begin the process of removing field history data older than 24 months. Because of the rolling nature of mass deletes, the data might still be available for some time after Spring '19. Where: This policy applies to all orgs created after June 1, 2011 who have not purchased the Field Audit Trail (FAT) add-on. Note: If your org was created before June 1, 2011, Salesforce commits to retain your field history beyond the 18-month limit. How: When field history data reaches the 18-month limit, Salesforce retains it for 6 more months, but the data is accessible only via Data Loader using Export All or the queryAll() API. After Salesforce deletes data, you can't use the getDeleted() API to retrieve it. To guarantee that you can access your field history data, purchase the FAT add-on. FAT lets you define a policy to retain archived field history data up to 10 years from the time the data was archived. To purchase FAT or for help retrieving your field history before it's deleted, contact Salesforce Customer Support. (Pg. 56)
- Create Custom Big Objects from Setup: A big object stores and manages a massive amount of data natively on the Salesforce platform. You can archive data from other objects or bring massive datasets from outside systems into a big object to get a full view of your customers. Big objects provide consistent performance, whether you have 1 million records, 100 million, or even 1 billion. Previously, creating a big object required using Metadata API. But now, if you aren't comfortable using the API, you can create a big object in Setup, define its fields, and build the index that defines how the big object is queried. (Pg. 30, 328, 329)
- Create Objects from Spreadsheets: Now with a few clicks, you can create a custom object by importing its fields and field data from a Google sheet, a Quip spreadsheet, a .xls file, or a .csv file. Not only can you create an object and its fields quickly, but when you're done, all its data is there, too. To create a custom object from a spreadsheet, navigate to Setup>App Manager>Select an App>Edit>Navigation Items and click on the new Create button at the top of the Available Items list. (Pg. 64, 299, 328, 329)
Functionality to Note:
- Browser Support Ending for Internet Explorer version 9 and 10: We will no longer support Internet Explorer 9 and 10 as of April 5, 2019. We recommend moving to a supported browser, such as Chrome, Firefox, Safari, Edge, or Internet Explorer version 11. After April 5, 2019, you can continue to access Salesforce Classic using IE9 and IE10. However, Salesforce will not provide support for issues that you encounter using these browsers. (Pg. 37)
-
- Salesforce for Outlook: More Cloud-Based Alternatives and the Latest Installable Version Tired of manual upgrades? We are too! Check out the improvements to our latest product alternatives: the Outlook Integration, Lightning Sync, and Einstein Activity Capture. Today could be the day that you move to something better. Or, if you want to stick to familiar ground, get security improvements and bug fixes when you upgrade to Salesforce for Outlook v3.4.5. (Pg. 13, 125, 129, 130)
- Generate Survey Invitations for Contacts and Person Accounts: Broaden your survey scope. You can now generate a customized survey invitation for a contact or a person account directly from the record. (Pg. 13)
- Sync Events and Contacts with Einstein Activity Capture: Lightning & Einstein Only. This productivity-boosting feature does more than just associate email and events to related Salesforce records. 'Einstein Activity Capture' now syncs events and contacts between sales reps' Google or Microsoft® accounts and Salesforce. With everything captured, and in sync, reps can get back to more important things – like selling! Syncing occurs for Einstein Activity Capture users that meet the following criteria:
* The email account on their user record is connected to Salesforce.
* You add them to an Einstein Activity Capture configuration that includes syncing.
How? From Setup, go to the Einstein Activity Capture settings page. Create a configuration that syncs contacts or events. (Pg. 96, 97)
Reports:
- Filter Reports by Inactive Picklist Values: Filtering a report by picklist values is helpful when you want to focus on a specific product family, opportunity stage, or area of the business. Previously, you could filter reports on active picklist values only. Now you can filter by picklist values that are marked inactive as well. (Pg. 19, 195, 200)
- Gather Insights Faster with Stacked Summaries: You created those complex—but awesome – matrix reports so you could summarize large volumes of data and compare values in different fields. But the summarized metrics that you wish to compare are not always conveniently located next to each other. For a more viewer-friendly version of the report involves less scrolling, view the report with Stacked Summaries option enabled. TheStacked Summaries option is available for all matrix reports in the report footer. By default, stacked summaries are enabled in Lightning report builder and the run page. (Pg. 19, 195, 199, 200)
- Quickly Focus on Relevant Data with Conditional Formatting (Beta): It is now possible to apply conditional formatting to reports in Lightning Experience. You can now apply up to five formatting rules to a report in a Lightning Experience. And, you can define up to three bins for each rule you apply. Setting the color for each bin is not only faster but now, you can also customize colors! Please note that conditional formatting is only available in the summary ormatrix report. (Pg. 19, 195, 199, 200)
- Subscribe to Reports and Dashboards by Group or Role:Now you can add subscribers to report sand dashboards based on Public Group or Role. A group subscription keeps your subscriber list current even when people join or leave the group. A role-based subscription keeps your subscriber list current even when people change roles. (Pg. 19, 200)
Sandboxes and Developing in Salesforce:
- Sandbox Cloning and Email Reformatted: Cloning Generally Available and a New User Email Address Format. We're improving application development with sandbox cloning. And, we're introducing a new format for copied user email addresses in sandboxes. (Pg. 360)
- Simpler Format for User Email Addresses in Sandboxes: When you create or refresh a sandbox, Salesforce appends .invalidto all user email addresses. This email invalidation ensures that production users aren't sent automatically generated messages from the sandbox. For example, the address name@email.com becomes name@email.com.invalid. Previously, the address changed to name=email.com@example.com. (Pg. 35, 377)
- Password Special Characters: Include Even More Special Characters in Passwords. Get more creative with your passwords. Salesforce now supports these special characters: ! " # $ % & ' ( ) * + , – . / : ; < = > ? @ [ \ ] ^ _ ` { | } ~. (Pg. 31, 64, 334, 342)
- Google Integration: Setup and Data Integration: New Google Analytics Connector, SAQL in Dataflow Filters, Event-Based Dataflow Scheduling Load your website statistics with the Google Analytics connector. Create more targeted dataflow filters with SAQL. Schedule dataflows to run after data sync with event-based scheduling. (Pg. 13, 72, 214)
Communities:
- Enable External Org-Wide Defaults in Orgs with Communities or Portals. This is a Critical Update. This update enables the External Sharing Model and provides admins with a list of objects whose default external access settings must be reviewed. This update helps you secure your data by letting you set more restrictive levels of access for external users. Before Spring '19, org-wide defaults gave internal and external users the same default access to objects. After activating this update, external org-wide defaults are enabled in all orgs with communities or portals. (Pgs. 61 & 272 & 425)
Published: Takunda Burutsa
January, 2019